How To Implement Standards Based Grading In 6 Steps This Year
You’ve probably noticed it: a student aces every test, participates daily, clearly understands the material, but earns a B because they turned in homework late. Meanwhile, another student scrapes by with an A thanks to extra credit and compliant behavior. Traditional grading often measures compliance more than learning, and if that frustrates you, you’re already halfway to understanding how to implement standards based grading. It’s a shift that puts mastery at the center of your gradebook instead of points, penalties, and percentages.
Here at The Cautiously Optimistic Teacher, we build resources that help educators teach smarter, not just harder. Standards based grading fits squarely into that mission because it forces us to answer a fundamental question: what do students actually know and can do? That clarity changes everything, from how you design assessments to how you communicate with parents.
This guide breaks the transition into six concrete steps you can start working through this year. Whether you’re a single teacher testing this in your own classroom or part of a team exploring a school-wide shift, you’ll walk away with a practical roadmap, including subject-specific examples, to make standards based grading work without burning out in the process.
What standards-based grading changes and what it doesn’t
When teachers first explore how to implement standards based grading, they often worry it means scrapping everything they’ve built. That’s not the case. Standards based grading replaces the point-accumulation model with a system that tracks student progress toward specific learning targets. Your lessons, your relationships with students, your curriculum maps, none of those disappear. What changes is the logic behind your gradebook and what the scores actually communicate to you, your students, and their families.
What standards-based grading changes
The biggest shift is in what a grade represents. In a traditional system, a grade bundles homework completion, behavior, extra credit, and test scores into one muddled number. Standards based grading separates those things out. A proficiency score in your gradebook tells you and the student exactly which skill is being measured and how close they are to mastering it.
A grade should answer one question: can this student demonstrate the skill? Everything else is noise.
This shift also changes how you handle retakes and late work. In a traditional system, retaking a test feels unfair because the first attempt carried point value. In a standards based system, reassessment is the whole point. If a student didn’t master a standard the first time, they get another chance to prove they can. Late work policies also loosen because submission timing doesn’t change whether someone actually learned the material.
What stays the same
Here’s what stays intact: your core instructional practices. You still plan units, write lesson objectives, deliver instruction, and check for understanding. Standards based grading doesn’t demand you reinvent your teaching style. It asks you to align your assessment data to specific learning targets rather than tallying points across a semester.
Your subject content doesn’t change either. If you teach 8th-grade English, you still teach argument writing, literary analysis, and grammar. Each of those areas gets its own proficiency track instead of being averaged into one final grade. A student who writes strong arguments but struggles with grammar mechanics gets specific, useful feedback rather than a vague 78%.
| Traditional Grading | Standards Based Grading |
|---|---|
| One grade mixes behavior, effort, and skills | Separate scores for each learning standard |
| Extra credit can mask skill gaps | Grades reflect demonstrated mastery only |
| Retakes feel like unfair advantages | Reassessment is built into the process |
| Late penalties lower academic grades | Academic grades stay tied to skill, not compliance |
| Hard to pinpoint where a student struggles | Clear data on each standard makes gaps visible |
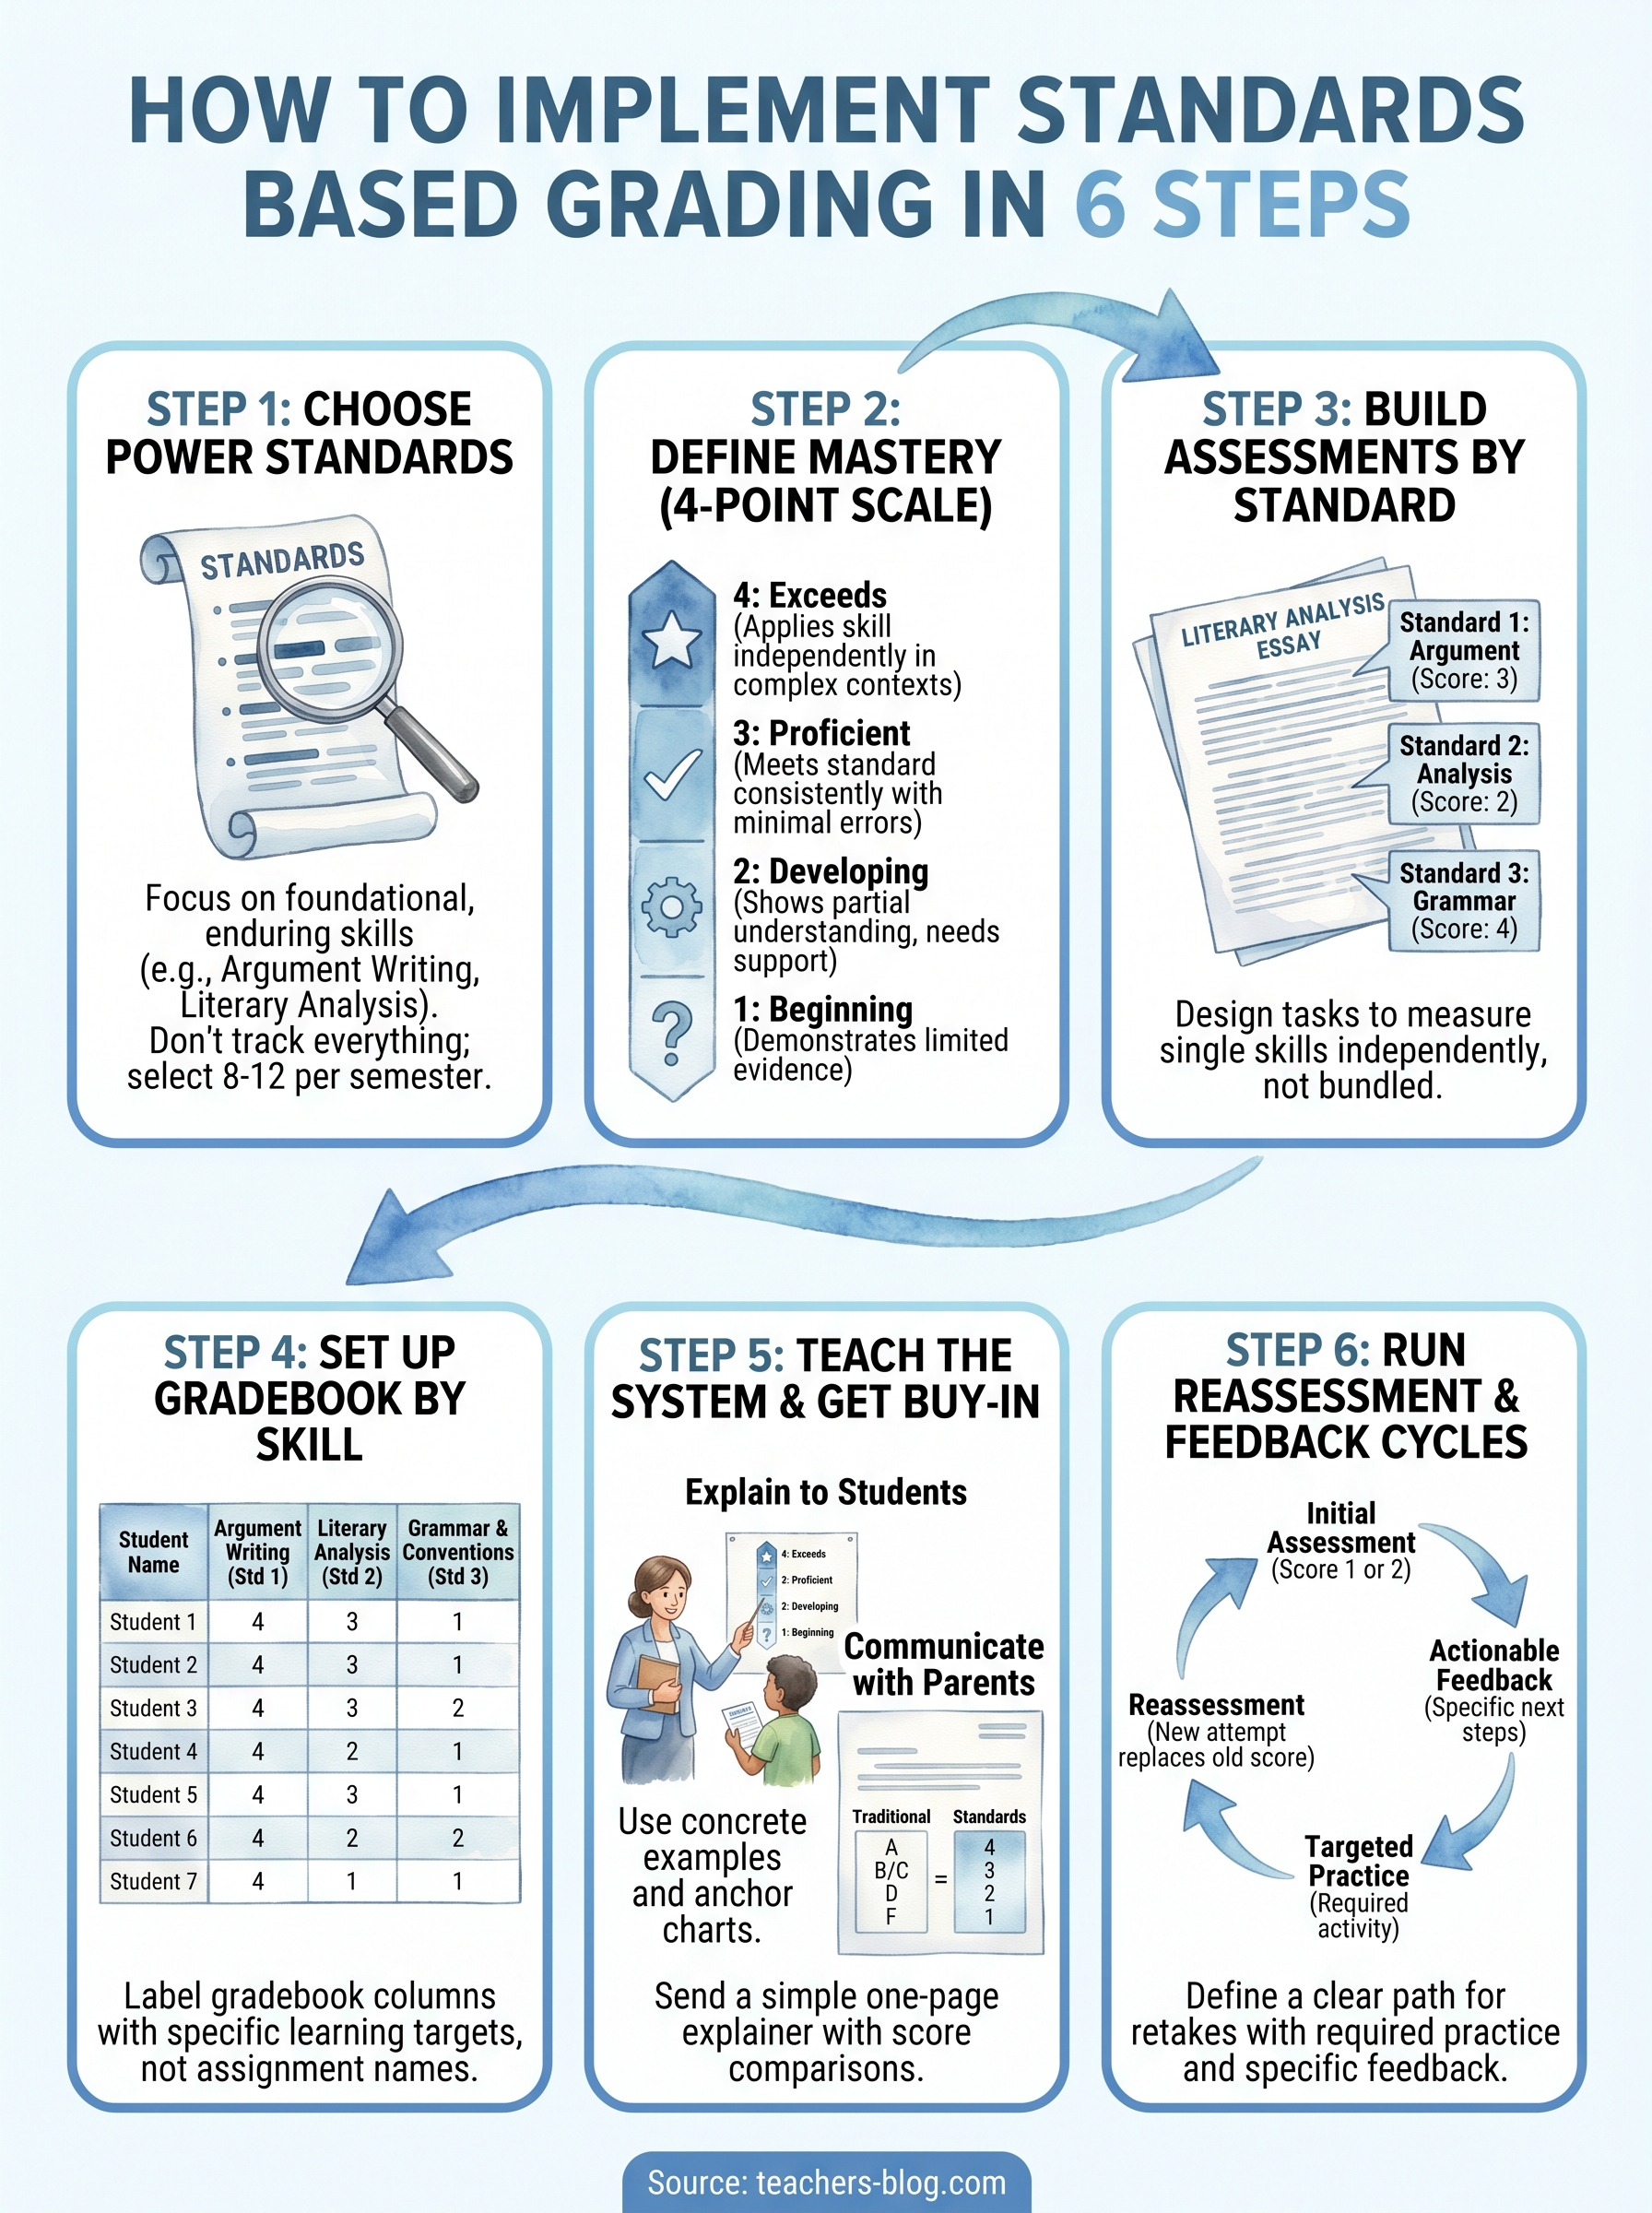
Step 1–2. Choose standards and define mastery
Before you build a single assessment or set up your gradebook, you need to know exactly which standards you’re tracking and what it means for a student to have mastered each one. These two steps form the foundation of knowing how to implement standards based grading correctly. Skip them, and everything downstream becomes guesswork.
Step 1: Choose your standards
Start with your state or district standards and narrow them down to the ones that matter most for your course. You do not need to track every single standard in your gradebook. Instead, focus on the power standards – the skills that are foundational, appear across multiple units, and prepare students for the next level of learning.
Tracking 8 to 12 power standards per semester gives you enough data without drowning students in separate scores.
For an 8th-grade English class, your power standards list might look like this:
- Argument writing: Develop a clear claim with supporting evidence
- Informational reading: Identify central idea and analyze how it develops
- Literary analysis: Analyze how an author’s choices impact meaning
- Grammar and conventions: Apply standard grammar in writing
- Speaking and listening: Present ideas clearly and respond to questions
Step 2: Define what mastery looks like
Once you have your standards, you need a proficiency scale that tells students and parents exactly what each score means. A four-point scale works well for most classrooms because it creates clear distinctions without overcomplicating your gradebook.
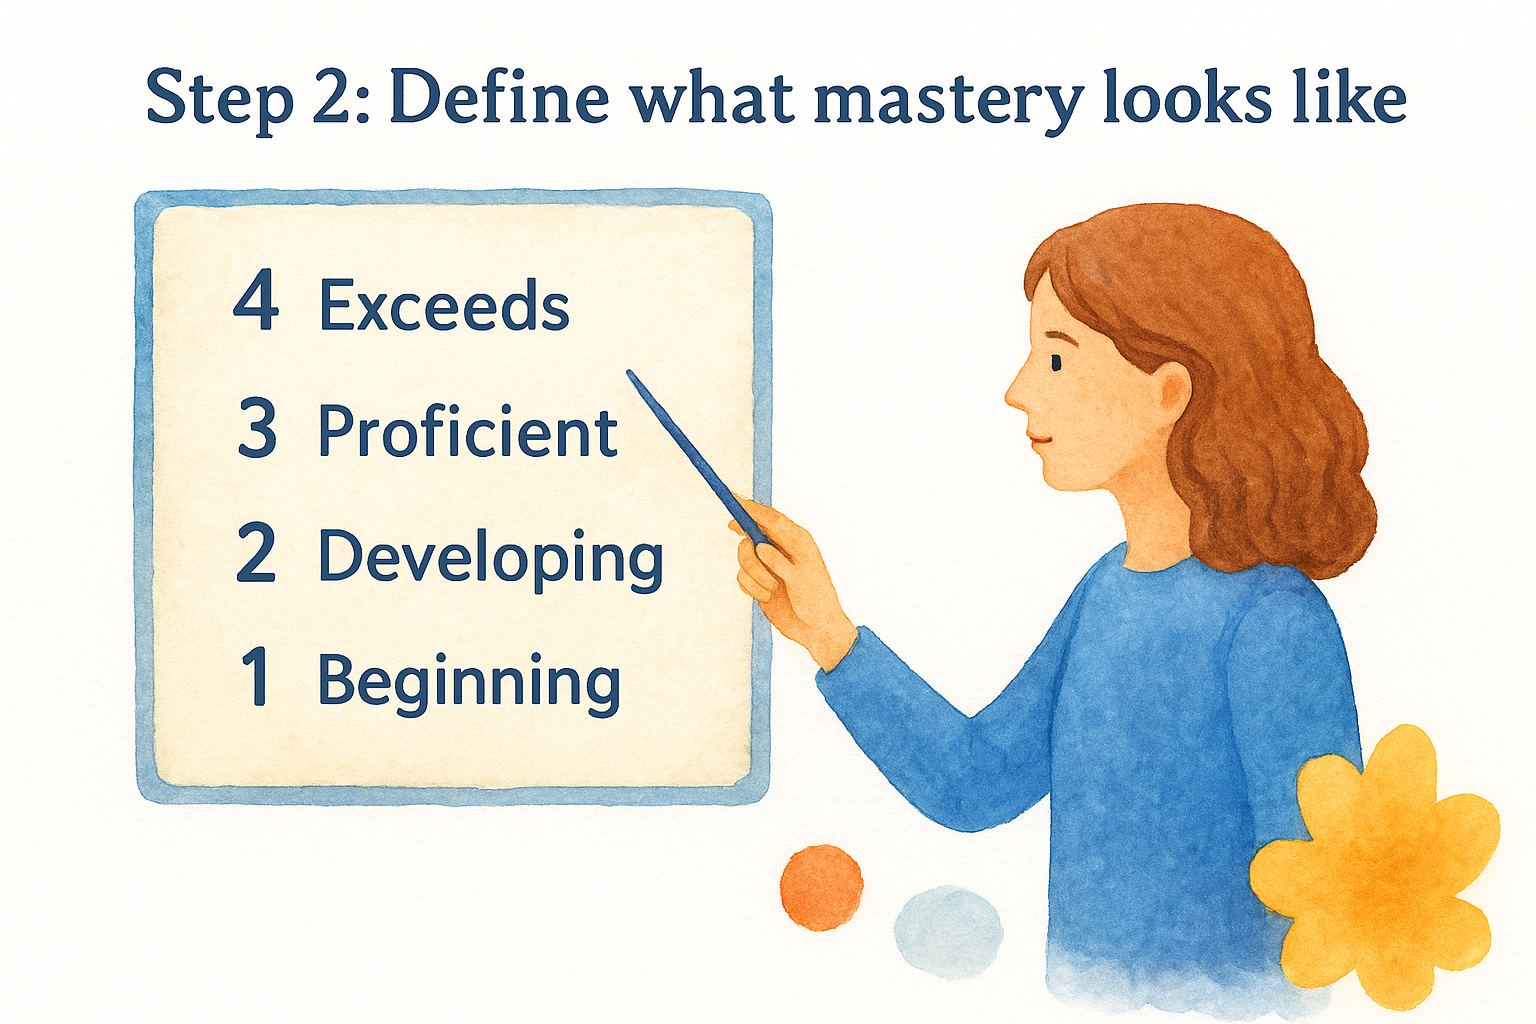
Use this template as your starting point:
| Score | Label | What it means |
|---|---|---|
| 4 | Exceeds | Applies the skill independently in new or complex contexts |
| 3 | Proficient | Meets the standard consistently with minimal errors |
| 2 | Developing | Shows partial understanding but needs additional support |
| 1 | Beginning | Demonstrates limited evidence of the skill |
Write one or two specific descriptors for each score level tied to your actual standard. Vague language like "shows understanding" does not help students know what to do differently on their next attempt.
Step 3–4. Build assessments and gradebook setup
With your standards chosen and your proficiency scale defined, you can now build the tools that make standards based grading visible and functional day-to-day. Steps 3 and 4 work together because your assessments need to match your gradebook structure before you ever hand a single assignment back to students. This is the mechanical core of how to implement standards based grading in a way that actually holds up over a full semester.
Step 3: Design assessments around single standards
Most traditional assessments bundle multiple skills into one score. Standards based assessments do the opposite. Each task should give you clear evidence for one standard at a time. You can still use longer assignments, but you need to score each standard separately rather than averaging them into a single grade.
One assessment can address multiple standards, but each standard must be scored independently.
For an 8th-grade literary analysis essay, break your scoring out like this:
| Standard Assessed | What you’re looking for |
|---|---|
| Literary analysis | Student identifies how author choices impact meaning |
| Argument writing | Claim is clear and evidence directly supports it |
| Grammar and conventions | Sentences are complete and mechanics are consistent |
Step 4: Set up your gradebook
Your gradebook needs a column for each power standard, not for each assignment. Most digital gradebooks, including those inside Google Classroom and other common platforms, let you customize category names. Label each column by standard, not by assignment name, so your data tells you where each student stands on a specific skill.
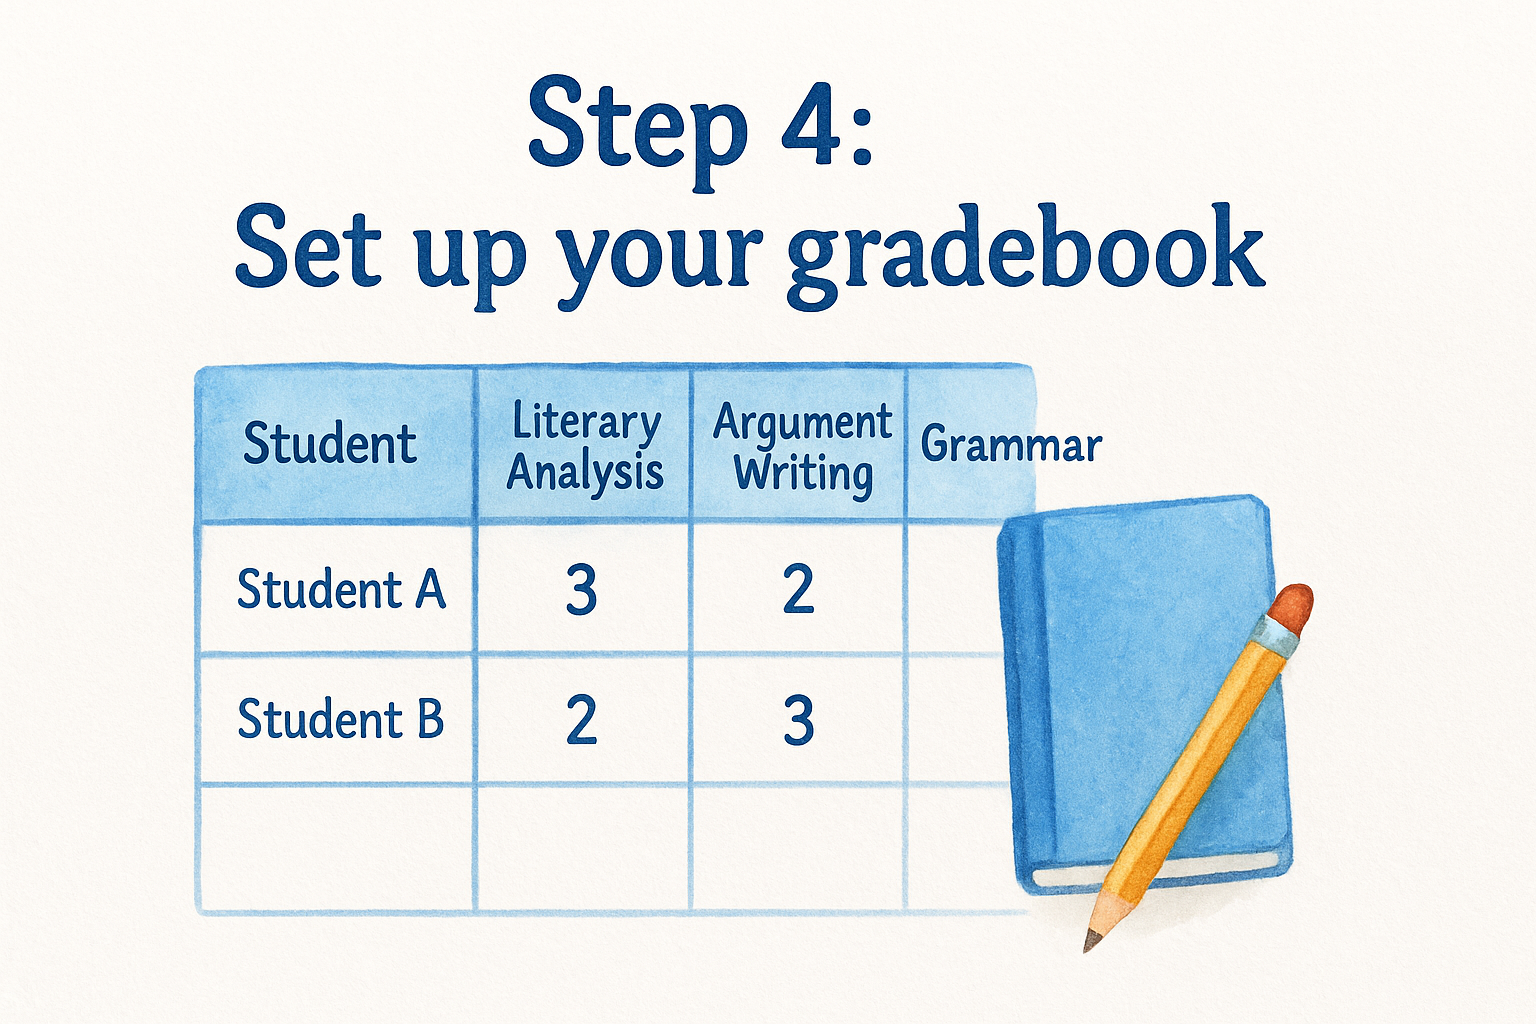
Use this basic gradebook template as your setup guide:
| Student | Literary Analysis | Argument Writing | Grammar | Informational Reading |
|---|---|---|---|---|
| Student A | 3 | 2 | 3 | 4 |
| Student B | 2 | 3 | 1 | 2 |
Update scores after each assessment, and always replace the old score with the new one when a student reassesses. That single habit keeps your gradebook honest.
Step 5. Teach the system and get buy-in
A well-designed gradebook fails if students and parents don’t understand what the scores mean. Teaching the system is not a one-time announcement; it’s an ongoing conversation that determines whether your transition actually sticks. Knowing how to implement standards based grading is only half the work; the other half is making sure the people it affects can read and use the information you’re giving them.
Explain scores to students directly
Students need to hear a clear explanation of what each score level means before they see their first proficiency grade. Walk them through your four-point scale on day one, and give them a concrete example using a skill they already know. Show them side by side what a "2" response looks like versus a "3" so the difference is visible, not abstract.
Students who understand the rubric before the assessment perform better and ask sharper questions during feedback.
Use a short anchor chart or printed reference card that students keep in their binder. This removes the question "what does this score mean?" from every conversation and replaces it with "what do I need to do to move up?"
Communicate with parents early
Parents raised on letter grades will find a four-point proficiency scale confusing unless you explain it upfront. Send a one-page explainer home during the first week that defines each score level, explains why late work no longer lowers academic grades, and describes how reassessment works.
Keep that communication direct and free of jargon. A table like the one below makes the comparison concrete for parents who need a familiar reference point:
| Traditional Grade | Standards Score Equivalent |
|---|---|
| A | 4 – Exceeds |
| B/C | 3 – Proficient |
| D | 2 – Developing |
| F | 1 – Beginning |
Step 6. Run reassessment and feedback cycles
Reassessment is what separates standards based grading from traditional grading in practice. Without a structured process for retakes and targeted feedback, students treat their initial score as final and the whole system loses its purpose. The last step in knowing how to implement standards based grading is building a cycle that keeps students moving toward mastery after the first assessment instead of simply accepting a low score and moving on.
Set a clear reassessment structure
You need to give students a defined pathway to reassess, not an open-door policy that creates chaos in your schedule. Require students to complete a brief reflection or targeted practice activity before they can request a reassessment. This step ensures they do something different instead of repeating the same attempt and hoping for a better result.
Students who complete a targeted practice task before reassessing improve their scores more consistently than those who retake without any preparation.
Use this simple reassessment request template:
| Field | What the student fills in |
|---|---|
| Standard being reassessed | Name the specific skill |
| Original score | What they earned |
| What they practiced | Describe the preparation activity |
| Requested reassessment date | When they want to attempt it |
Give feedback that drives action
Feedback only works if students know exactly what to do next. After each assessment, return work with one or two specific notes tied directly to your proficiency scale. Instead of writing "needs improvement," write something like: "Your claim is present but your evidence doesn’t connect to it yet. Add a direct quote and a one-sentence explanation of how it supports your argument."
Pair written feedback with a short individual conference for any student sitting at a 1 or 2. A two-minute check-in during independent work time lets you show exactly where the gap is and what the student needs to practice before their next attempt.
Next steps for your gradebook
You now have the full framework for how to implement standards based grading, from selecting power standards to running reassessment cycles. The hardest part isn’t the system design; it’s starting. Pick one unit coming up in your next few weeks and apply these six steps to it before expanding to your full course load. That single unit gives you real data, real student feedback, and a clearer picture of what needs adjusting before you commit to a full-year rollout.
Your gradebook should feel like a diagnostic tool, not a punishment record. When every score points to a specific skill gap and every reassessment gives students a clear path forward, the gradebook starts working for learning instead of against it. Consistency over the first few months will matter more than perfection on day one. For more practical strategies, tools, and resources designed specifically for teachers, visit The Cautiously Optimistic Teacher and explore what’s waiting for your classroom.