Pear Deck for Google Slides: Setup for Interactive Lessons
You built a solid Google Slides presentation, walked through it in class, and… half the room zoned out by slide three. Sound familiar? The problem usually isn’t your content, it’s that a standard slideshow is a one-way street. Pear Deck for Google Slides changes that by turning your existing presentations into interactive lessons where every student has to respond, not just the kid who always raises their hand.
Pear Deck lets you embed draggable prompts, multiple-choice questions, and open-ended responses directly into your slides. Students engage on their own devices in real time, and you get instant formative assessment data without printing a single worksheet. Here at The Cautiously Optimistic Teacher, we’re always looking for tools that actually earn their setup time, and Pear Deck clears that bar for classroom engagement and quick checks for understanding.
This guide walks you through installing the Pear Deck add-on, building your first interactive slide deck, and launching a live session with your students. Whether you’ve never heard of Pear Deck or you installed it once and forgot about it, you’ll have everything you need to run an interactive lesson by the end of this article. Let’s get it set up.
What you need before you start
Before you install anything, make sure you have the right setup in place. Pear Deck for Google Slides runs as an add-on inside Google Slides, so you’ll need a Google account connected to Google Drive. Most teachers use a school-issued Google Workspace for Education account, which works perfectly. A personal Gmail account works too, but some school districts restrict add-on installations from non-approved sources, so check with your IT department if you run into any issues.
If your school district manages your Google Workspace settings, you may need admin approval before you can install third-party add-ons.
Accounts and access
You’ll need two accounts to get started: a Google account to access Google Slides and a Pear Deck account to run the interactive features. Pear Deck offers a free tier that covers all the core functionality, which is enough to follow every step in this guide. If your school has a Pear Deck Premium or school-wide license, sign up with your school email address to activate those features automatically rather than paying out of pocket.
- Google account: personal Gmail or Google Workspace for Education
- Pear Deck account: free sign-up at peardeck.com (use "Sign in with Google")
- School license: ask your admin whether your district already has one active
Device and browser requirements
Pear Deck works entirely inside your web browser, so you don’t need to install any desktop software beyond the add-on itself. Running your presentation in Google Chrome gives you the smoothest experience, though most Chromium-based browsers work fine. Your students can join a session from any device with a modern browser, including phones, tablets, and Chromebooks. They do not need their own Pear Deck account to participate, which removes a major barrier when you’re working with younger students or in a school that limits student account creation.
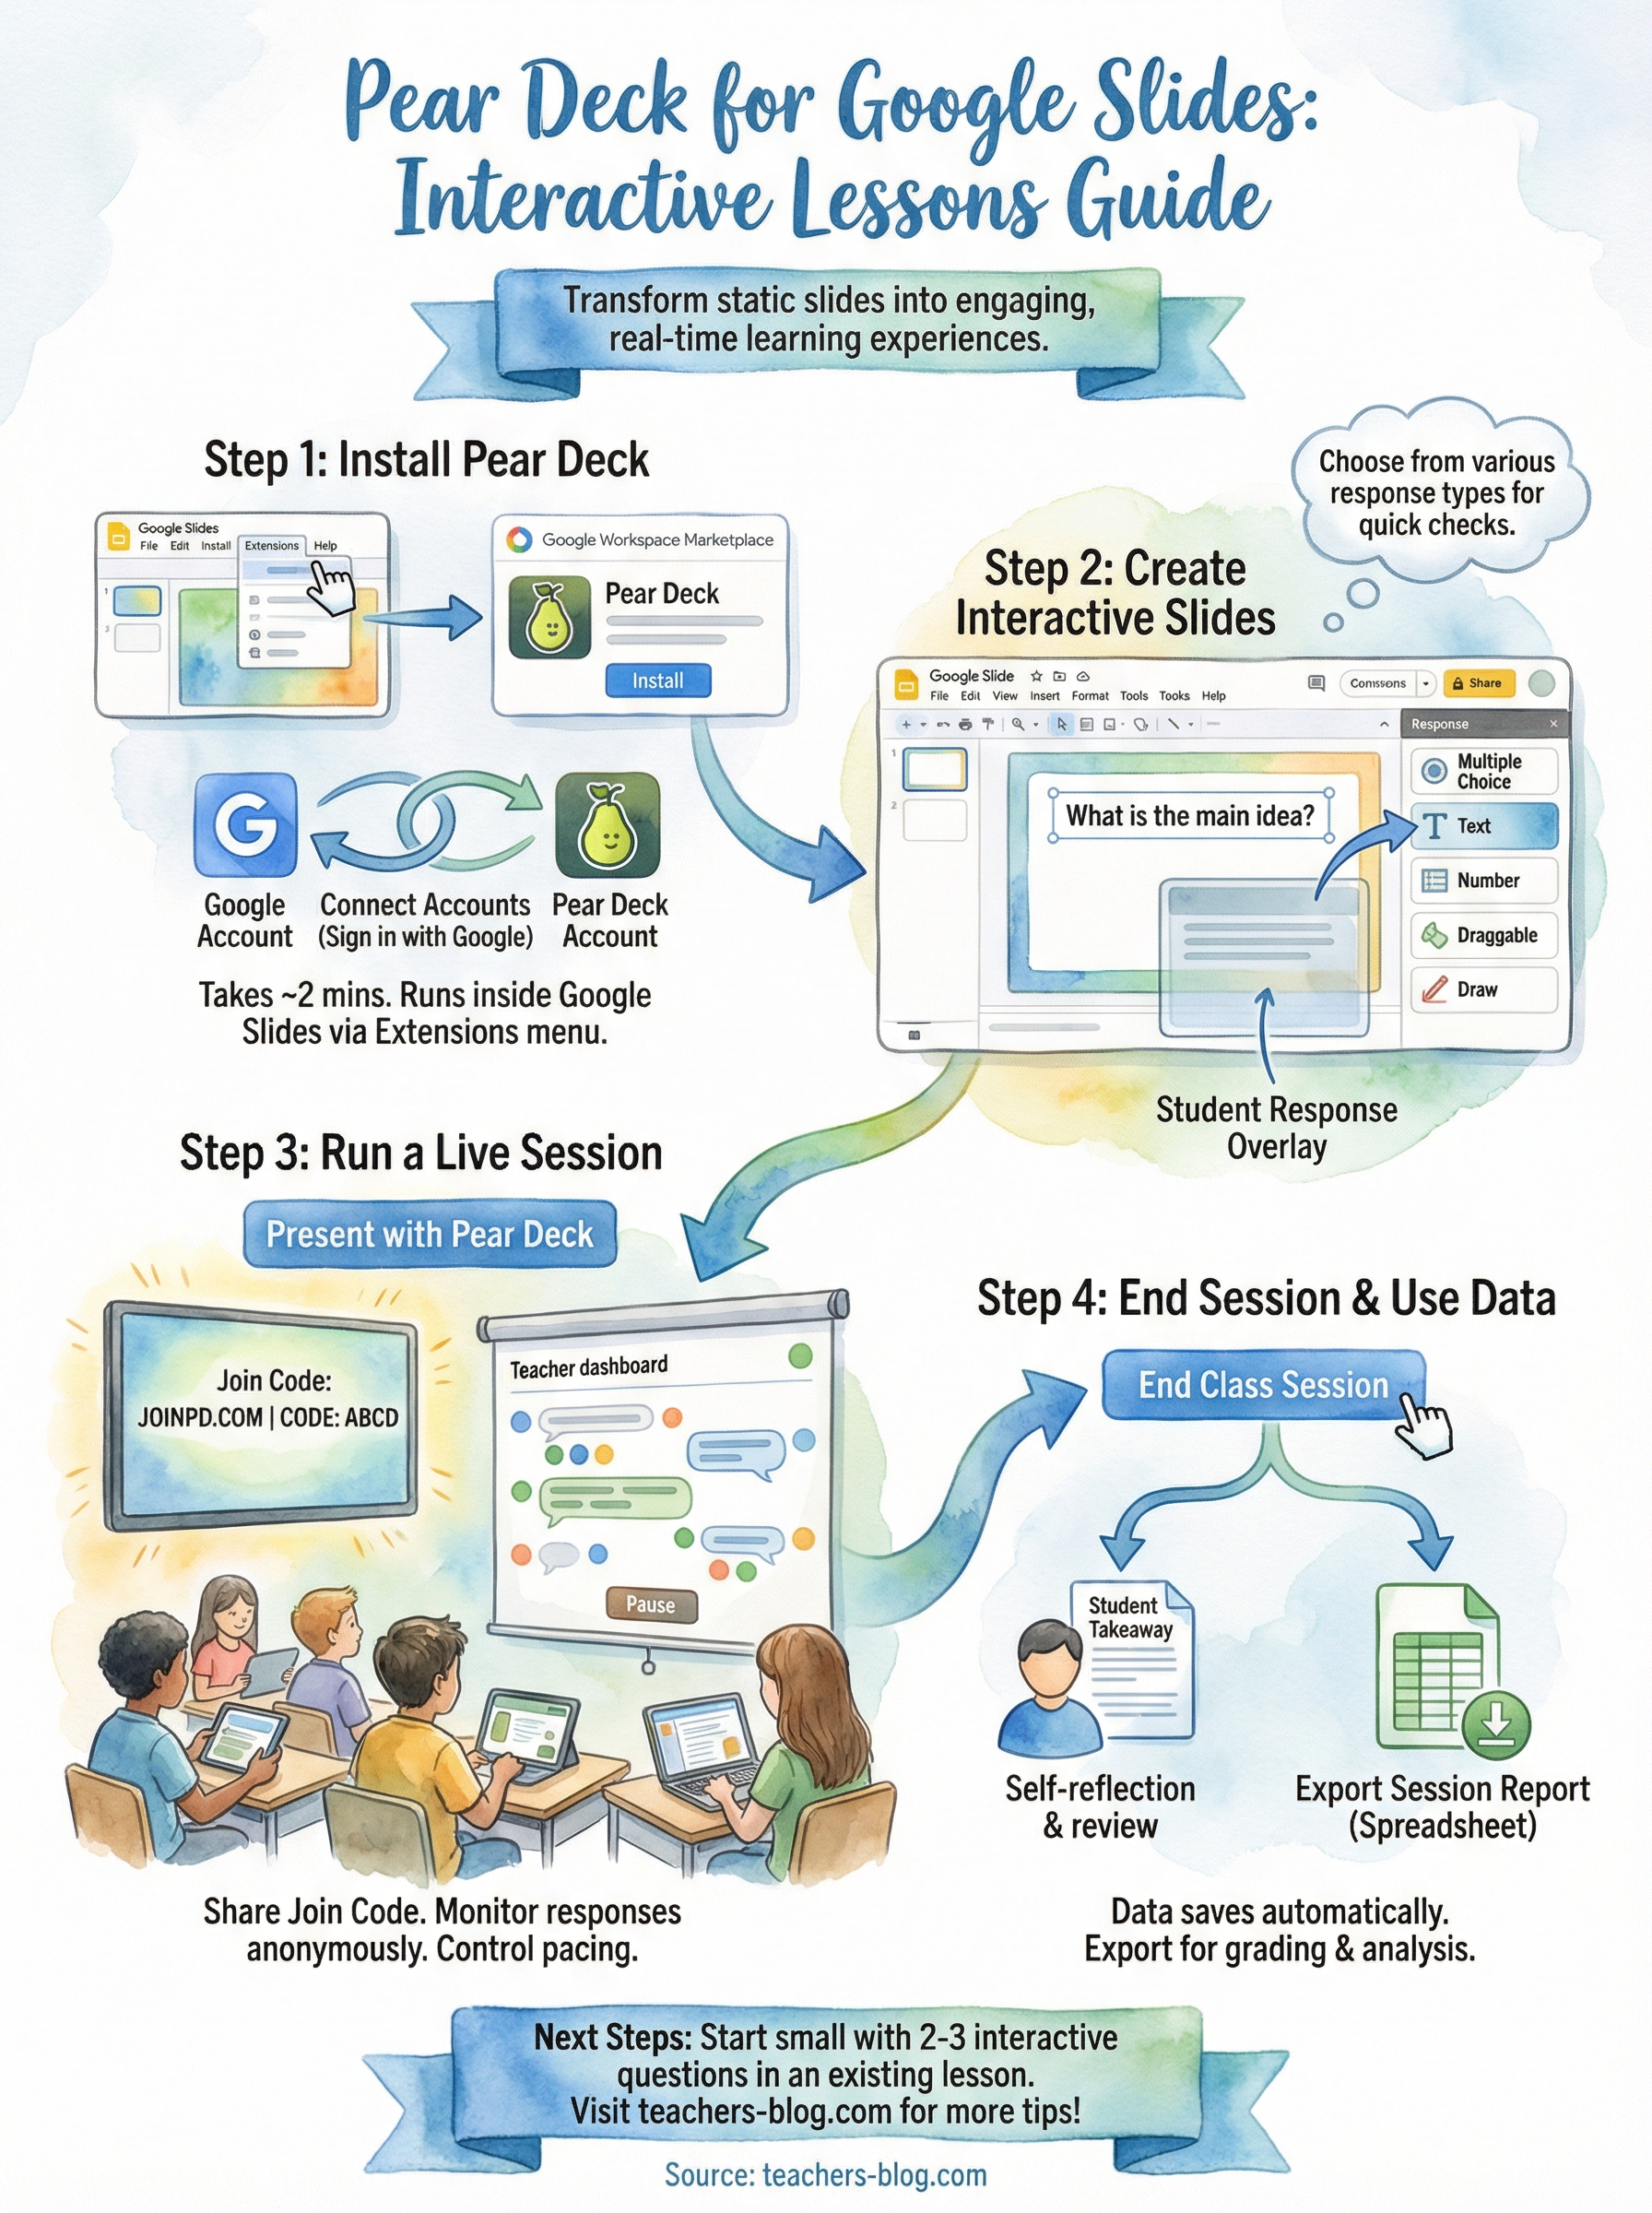
Step 1. Install Pear Deck in Google Slides
Installing Pear Deck for Google Slides takes about two minutes and happens entirely inside Google Slides. You don’t need to visit any external website first. Open any presentation in Google Slides, then follow the steps below.
Find the add-on
Open your presentation in Google Slides, then use the Extensions menu to reach the Google Workspace Marketplace:
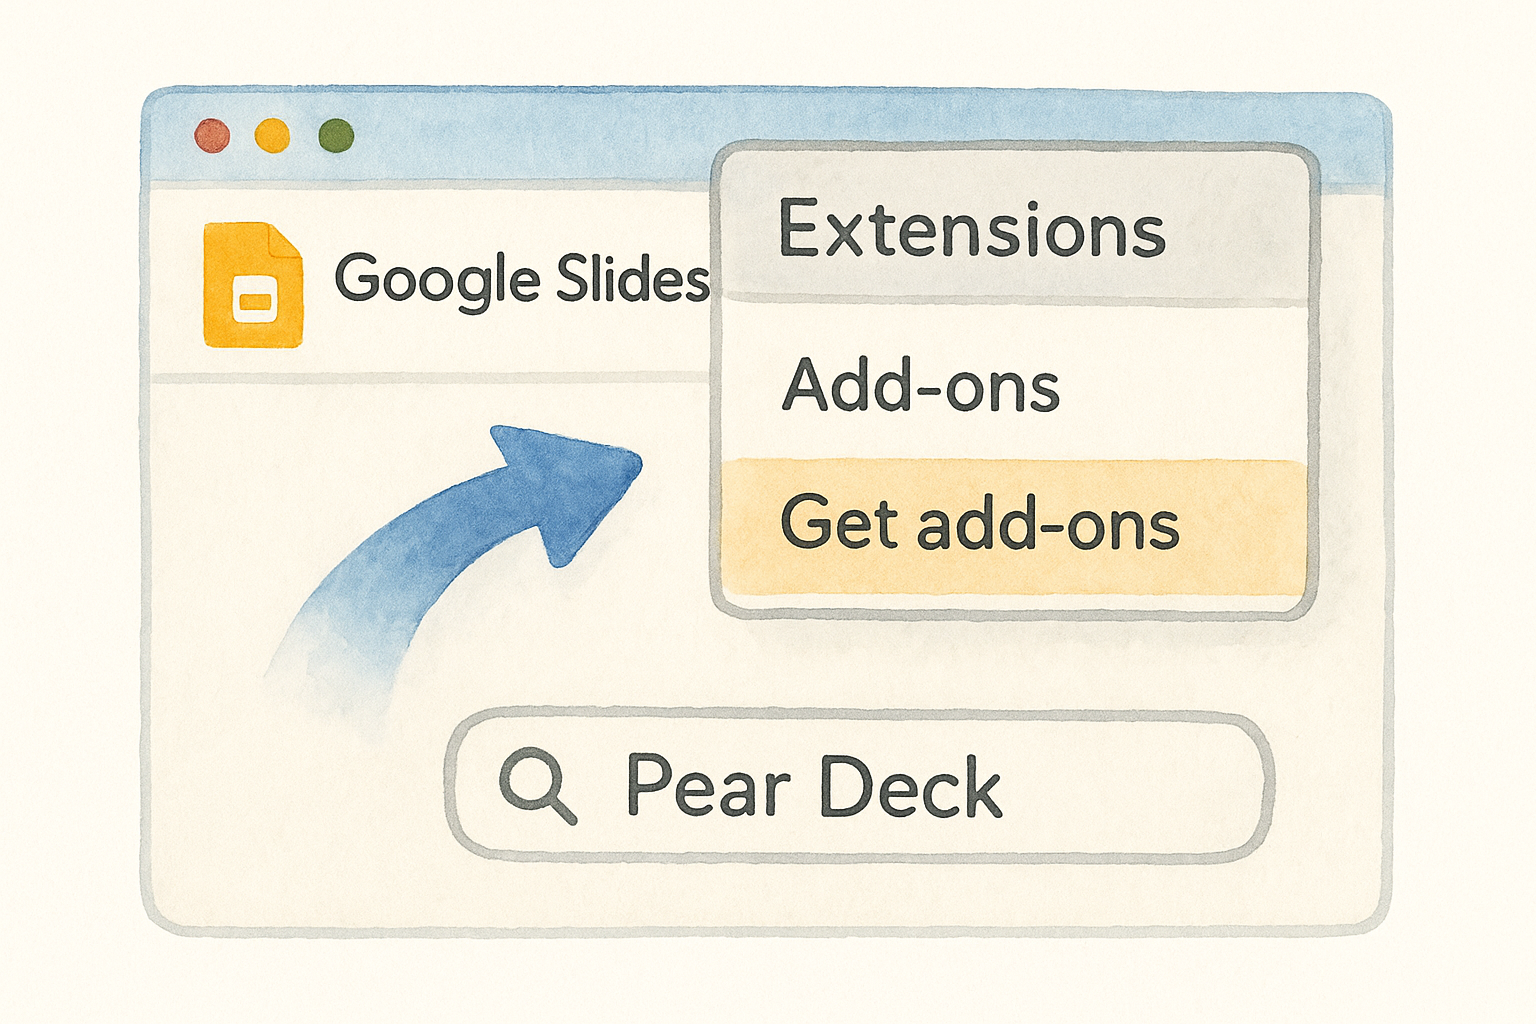
- Click "Extensions" in the top menu bar.
- Select "Add-ons," then click "Get add-ons."
- Type "Pear Deck" in the Marketplace search bar.
- Click the add-on result, then click "Install."
- Confirm the permissions prompt by clicking "Allow."
Once installation completes, a new "Pear Deck" option appears under your Extensions menu every time you open a presentation.
Connect your Pear Deck account
After installation, click Extensions > Pear Deck > Open Pear Deck Add-on to launch the sidebar panel on the right side of your screen. You’ll see a sign-in prompt immediately. Click "Sign in with Google" and select the same Google account tied to your presentation. Pear Deck links the two accounts automatically, and the sidebar loads your dashboard so you’re ready to start building interactive slides.
Step 2. Turn slides into interactive questions
With the Pear Deck sidebar open, you can add an interactive question to any slide in seconds. Click the slide you want to make interactive, then choose a question type from the sidebar panel. Pear Deck for Google Slides supports several response formats, each suited to a different kind of check for understanding.
Pick the question type that matches what you actually want to know, not just the easiest one to grade.
Choose your question type
The sidebar shows your response options clearly. Each type asks something different from your students, and picking the right one makes your formative assessment more useful:
| Type | Best use |
|---|---|
| Multiple choice | Quick comprehension checks |
| Text | Open-ended written responses |
| Number | Math answers or numerical estimates |
| Draggable | Place a point on an image or map |
| Draw | Annotate or sketch a response |
Place the response on your slide
After you select a type, Pear Deck inserts a response overlay directly onto the current slide. You can resize and reposition it to fit your layout without disrupting your existing design. Add your question text as a regular Slides text box so students can read the prompt clearly, then the response overlay captures their answer the moment you run the session.
Step 3. Run a session and monitor responses
Once your slides are ready, click "Present with Pear Deck" in the sidebar instead of using the standard Slides present button. Pear Deck for Google Slides generates a unique join code and a link that students use to enter the session from any device at joinpd.com.
Start the session
Share the join code with your class by projecting it or posting it in your LMS. Students enter the code, type their name, and land on their own response screen immediately. You control all slide navigation from the teacher dashboard, so students can only see the slide you’re currently on.
Students never advance the deck on their own, which keeps the whole class focused on the same content at the same time.
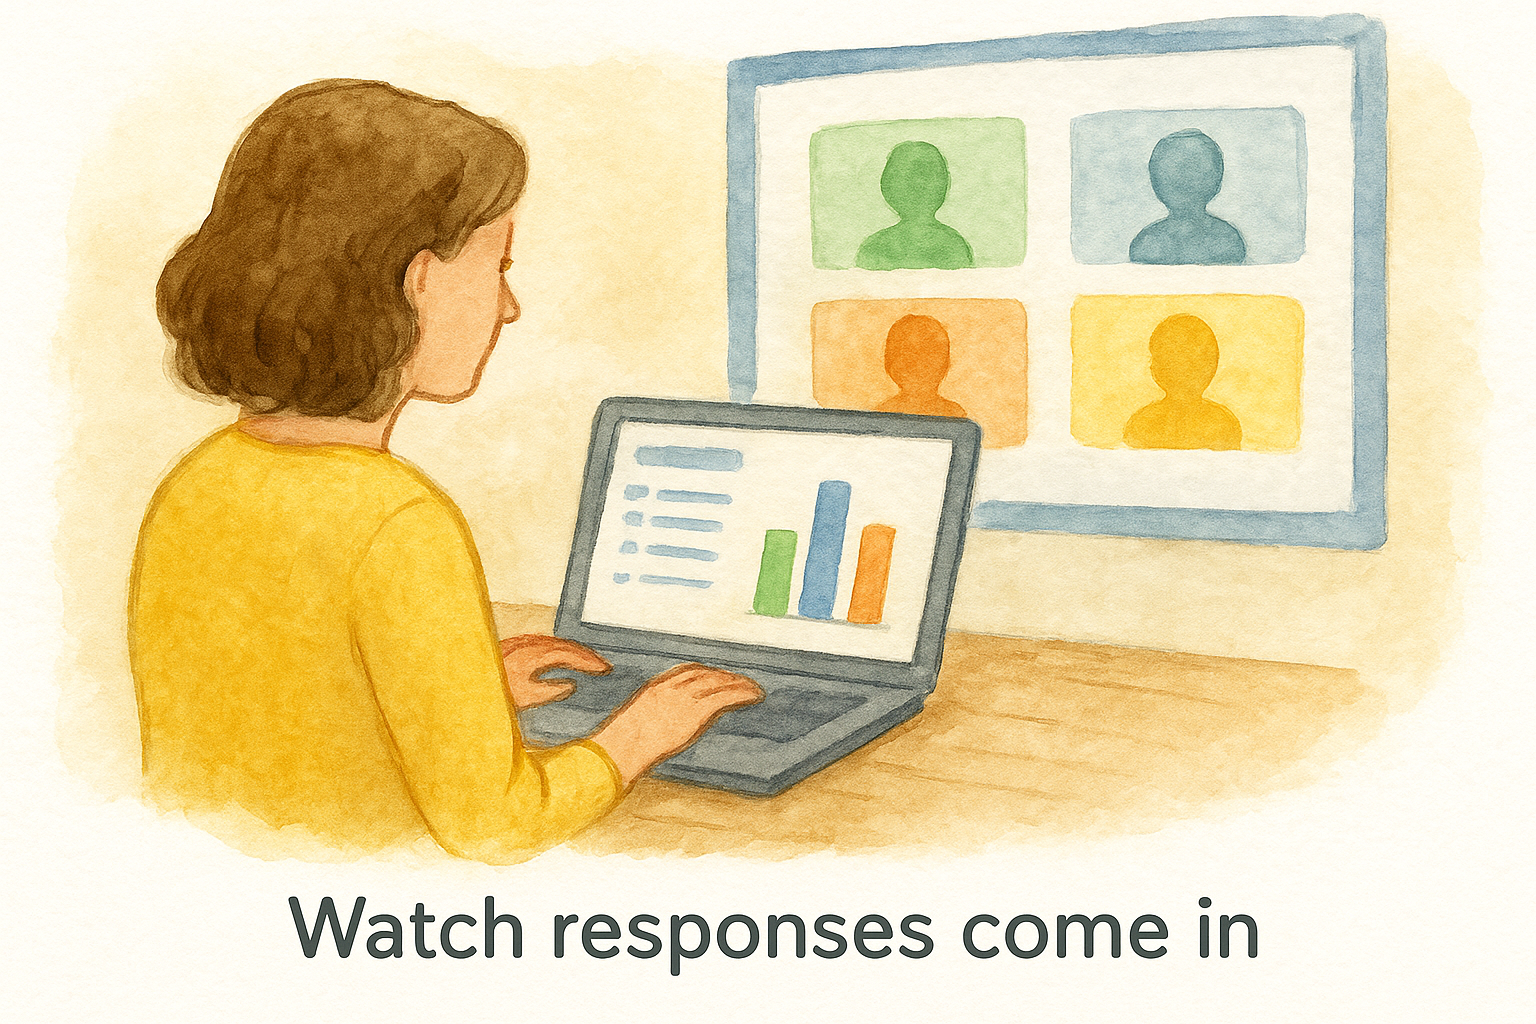
Watch responses come in
The teacher dashboard shows every student response as it arrives, displayed anonymously to the class on the projector view. You can see who has answered and who hasn’t at a glance, which lets you pause and wait for stragglers before moving on. Use the response data right there in the moment to call on specific patterns, address misconceptions, or adjust your pacing based on what the class actually understands.
Step 4. End the session and use student work
When you’re ready to wrap up, click "End Class Session" in the Pear Deck teacher dashboard. This closes student access immediately, so no one can submit additional responses after you’ve moved on. Pear Deck for Google Slides automatically saves the session data to your Pear Deck account, so you don’t lose anything the moment you close the tab.
Ending the session does not delete student responses. Everything saves to your account and stays accessible for as long as you need it.
Review the student takeaway
After you end the session, Pear Deck gives each student a Student Takeaway link they can open to review their own responses. This works as a built-in reflection tool without any extra setup on your end. Students can see what they submitted alongside your slide content, which reinforces the material after class.
Export responses for grading
Your session report lives in the Pear Deck dashboard under "Sessions." From there, you can export a spreadsheet that lists every student’s responses by slide. Use that data to:
- Identify students who need follow-up support
- Record participation for a formative grade
- Group students by response patterns for the next lesson
Next steps
You now have everything you need to install, build, and run your first interactive lesson with Pear Deck for Google Slides. Start small by converting one existing presentation, ideally a lesson where you already know students tend to drift. Add two or three interactive questions to that deck, run it with one class, and check the session report afterward. That single session will give you more data about student understanding than a week of hand-raising checks.
From there, build the habit of adding Pear Deck to one new lesson per week. The draggable and draw question types take a little more setup, but they work especially well for visual content like maps, diagrams, or literary analysis annotations. Once you see how much faster you can spot misconceptions in real time, you won’t want to go back to a static deck.
For more tools and strategies that make teaching more effective, visit The Cautiously Optimistic Teacher.