Seesaw Classroom App: How To Use It In Your Classroom
If you’ve been hearing buzz about the Seesaw classroom app but haven’t tried it yet, you’re not alone. Plenty of teachers know the name without knowing what it actually does, or whether it’s worth the setup time. The short answer: for elementary classrooms especially, it’s one of the most practical tools available for student portfolios, assignments, and parent communication.
Here at The Cautiously Optimistic Teacher, we’re all about finding tools that genuinely make your teaching life easier, not just shinier. Seesaw fits that criteria because it puts student work front and center while keeping families in the loop without extra effort on your end. It’s the kind of platform that earns its place in your workflow rather than adding to your to-do list.
In this guide, you’ll learn how to download Seesaw, get your students logged in, and actually use its features in a way that supports learning. Whether you’re brand new to the app or just need a clearer picture of what it can do, we’ll walk through everything step by step, no fluff, no filler, just what you need to get started.
What Seesaw is and when it fits best
Seesaw is a digital learning platform designed to connect students, teachers, and families in one shared space. At its core, it gives students a place to document and share their learning through photos, videos, drawings, text, links, and voice recordings. Teachers assign work, students submit it, and parents get a real-time window into what their child is doing at school without needing a separate parent-teacher conference to find out.
What Seesaw actually does
The seesaw classroom app runs on iPads, Android tablets, Chromebooks, and computers, so you don’t need a specific device to make it work. Students log in using a QR code or a text code with no email address required, which keeps things manageable at the younger grade levels where account setup can eat up your entire first period. Once inside, every piece of work a student submits builds into a growing digital portfolio that captures their progress across the whole school year.
Seesaw keeps student portfolios, assignments, and family communication in one place, which means you’re not jumping between three different platforms just to manage your classroom.
Teachers can create activities from scratch or pull from Seesaw’s activity library, which includes thousands of pre-built assignments. You can attach written instructions, short videos, and voice recordings to any activity so students know exactly what to do without needing you standing next to them the entire time. That independence matters, especially when you’re working with small groups.
When Seesaw fits your classroom best
Seesaw tends to work best in PreK through grade 5 classrooms, though some middle school teachers use it effectively too. If your students are too young to manage email accounts or complex logins, Seesaw’s QR code access makes the technology barrier almost disappear. It’s particularly strong when your goal is to capture student thinking and process, not just collect a finished product at the end of a unit.
For teachers who work in settings where family engagement is a priority, Seesaw builds that connection automatically. Every time a student adds work to their journal and you approve it, parents receive a notification on their phone. You control what gets shared and what stays private, but the communication happens without any extra steps on your end. If you’ve been looking for a way to involve families without sending home paper newsletters that never make it out of the backpack, this is a practical alternative.
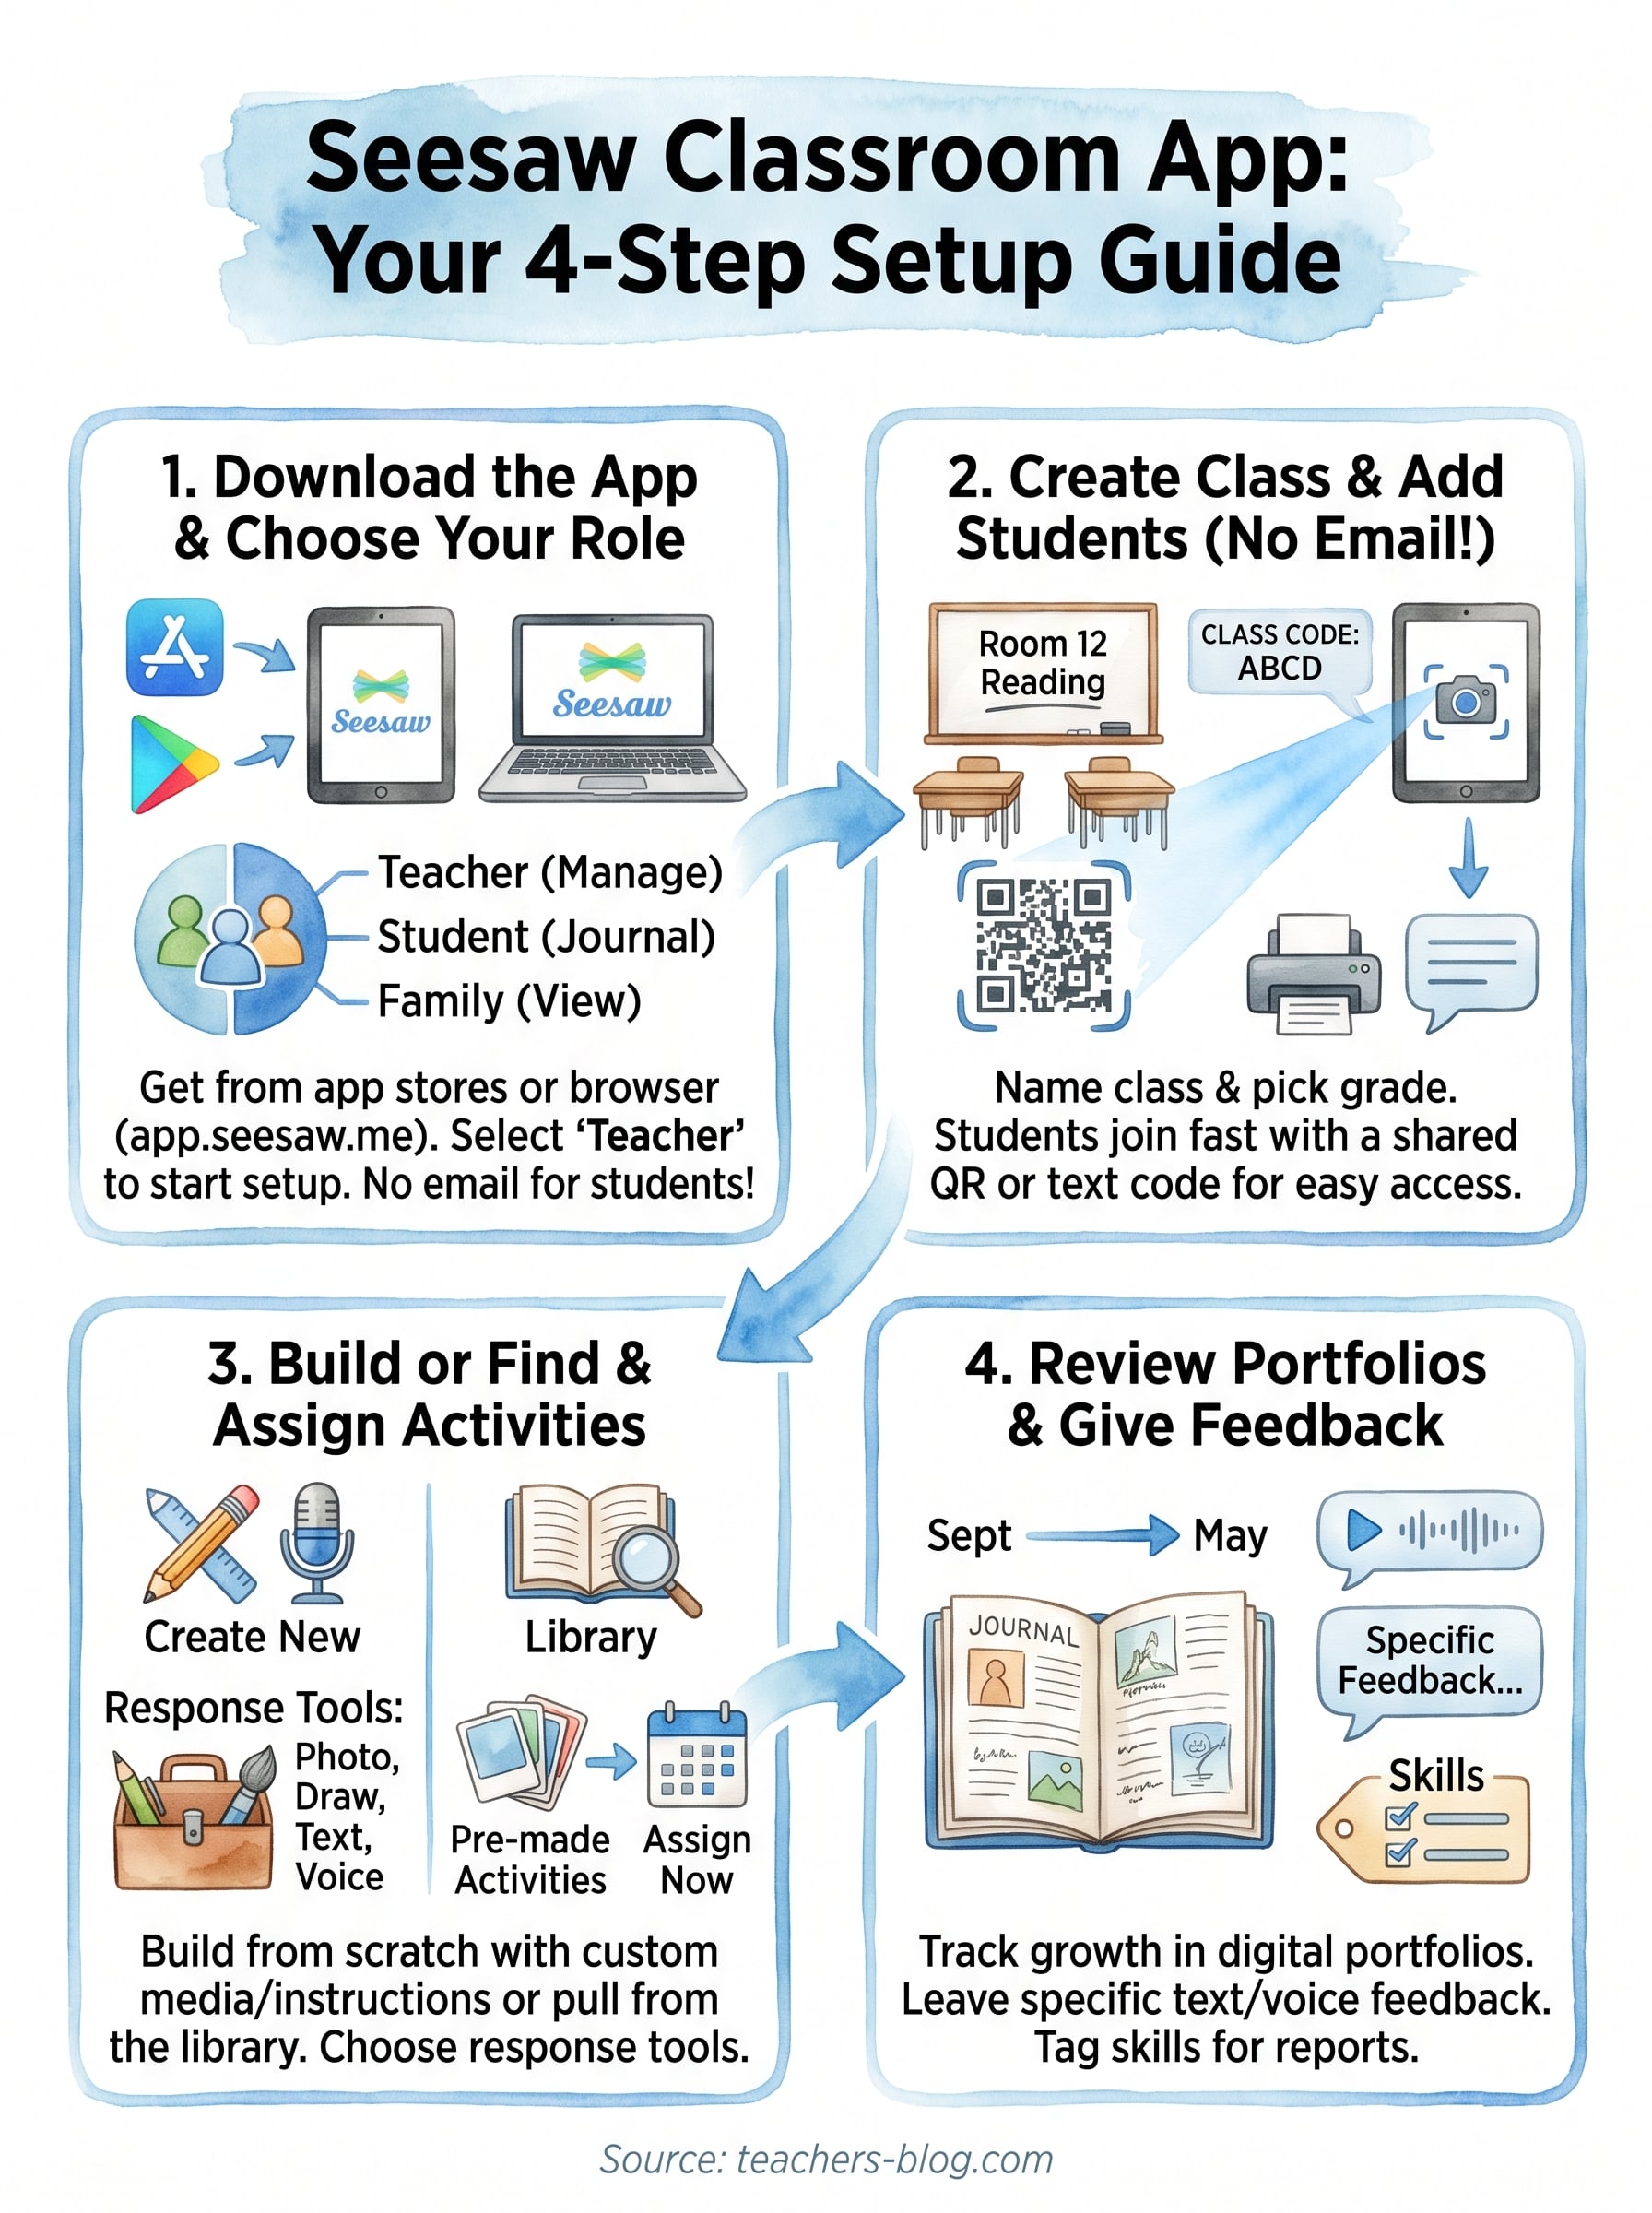
Step 1. Download the app and choose the right login
Getting the seesaw classroom app onto your device takes about two minutes. You can download it from the Apple App Store or Google Play, or access it directly in any browser at app.seesaw.me with no installation required. If your school runs on Chromebooks, the browser version handles everything the native app does, so you have full flexibility regardless of what devices your students use.
Use the browser version on your first login if you want to explore the teacher dashboard before committing to a specific device setup in your classroom.
The three login roles
Seesaw separates access into three distinct roles, and the app shows you this choice the moment you open it for the first time. Getting this right from the start prevents confusion later, especially once your students and their families begin logging in on their own. Here’s a quick breakdown of what each role does:
| Role | How they log in | What they access |
|---|---|---|
| Teacher | Email and password | Full class management, activities, and reports |
| Student | QR code or class text code | Their own journal and assigned activities |
| Family | Invite link from teacher | Their child’s approved journal posts only |
Logging in as a teacher
Select "I’m a Teacher" on the opening screen and sign up with your school email address. If your district uses Google Workspace or Clever, you can authenticate through single sign-on instead of creating a separate Seesaw password, which cuts out one more thing to remember.
Once you’re inside your account, Seesaw walks you through a short setup flow that points you directly toward creating your first class. Follow those prompts rather than skipping them; they cover the essentials in about three minutes and set up your account correctly from the start.
Step 2. Set up your class and add students
After your teacher account is ready, the next task is creating your class and getting your students connected. This is where the seesaw classroom app starts to feel real, because once students are in, the whole system becomes active and you can start assigning work immediately.
Create your class
From your teacher dashboard, click "Add Class" and fill in the basic details: class name, grade level, and subject. Seesaw uses this information to filter activity recommendations from its library, so accurate grade-level selection saves you time later when you’re browsing pre-built assignments. Name your class something students will recognize, like "Room 12 Reading" rather than something generic.
Set up one class at a time and run through the full student-access process before creating additional classes, so you catch any login issues early.
Get students into the room
Once your class exists, Seesaw generates a unique QR code and a text code for student access. You have two practical options for getting students in without requiring individual accounts:

- QR code login: Print the code, post it at your station, and students scan it with a tablet camera. Best for grades K-2.
- Text code login: Students open the app, select "I’m a Student," and type the short class code. Works well for grades 3-5 who can handle typing.
For each method, students enter their first name and last initial only, which keeps setup fast and privacy-friendly. Once a student logs in for the first time, their name appears on your roster automatically. You don’t need to upload a spreadsheet or send invitations one by one, which cuts your setup time down to a single class period.
Step 3. Create and assign activities students can finish
Once your students are connected, the seesaw classroom app gives you two paths for building assignments: create one from scratch or pull from the existing activity library. Both options take less time than you might expect, and students can begin working on them the same day you set them up.
Build an activity from scratch
From your class dashboard, click "Activities" then "Create Activity." Give the activity a clear title and write your instructions in the text box. You can also record a short voice note directly inside the app to explain the task in your own words, which helps younger students who struggle to read written directions on their own.
When you finish writing the instructions, choose what response tools students can use to submit their work. Seesaw lets you control this precisely, so students only see the options that match the task:
- Photo or video: Students capture real-world work or record themselves explaining their thinking.
- Drawing: Students sketch, annotate, or label directly on a blank canvas or an image you upload.
- Text: Students type a written response, which works best for grades 3 and up.
- Voice recording: Students record an oral response, useful for reading fluency checks or end-of-lesson reflections.
Limiting students to one or two response tools per activity keeps their focus on the learning task rather than experimenting with the technology.
Assign from the activity library
Seesaw’s library contains thousands of ready-made activities organized by grade level and subject. Search by keyword, filter by grade, and preview any activity before you send it out. You can also edit library activities before assigning them, so the task fits your lesson exactly rather than going to students unchanged.
Step 4. Use portfolios, feedback, and Skills to assess
Assessment in the seesaw classroom app happens in three connected layers: portfolios that collect student work over time, feedback that students can respond to, and Skills that let you tag and track specific learning standards. Together, these features give you a clearer picture of growth than a single test score ever could, and they happen inside the same platform where students already submit their work.
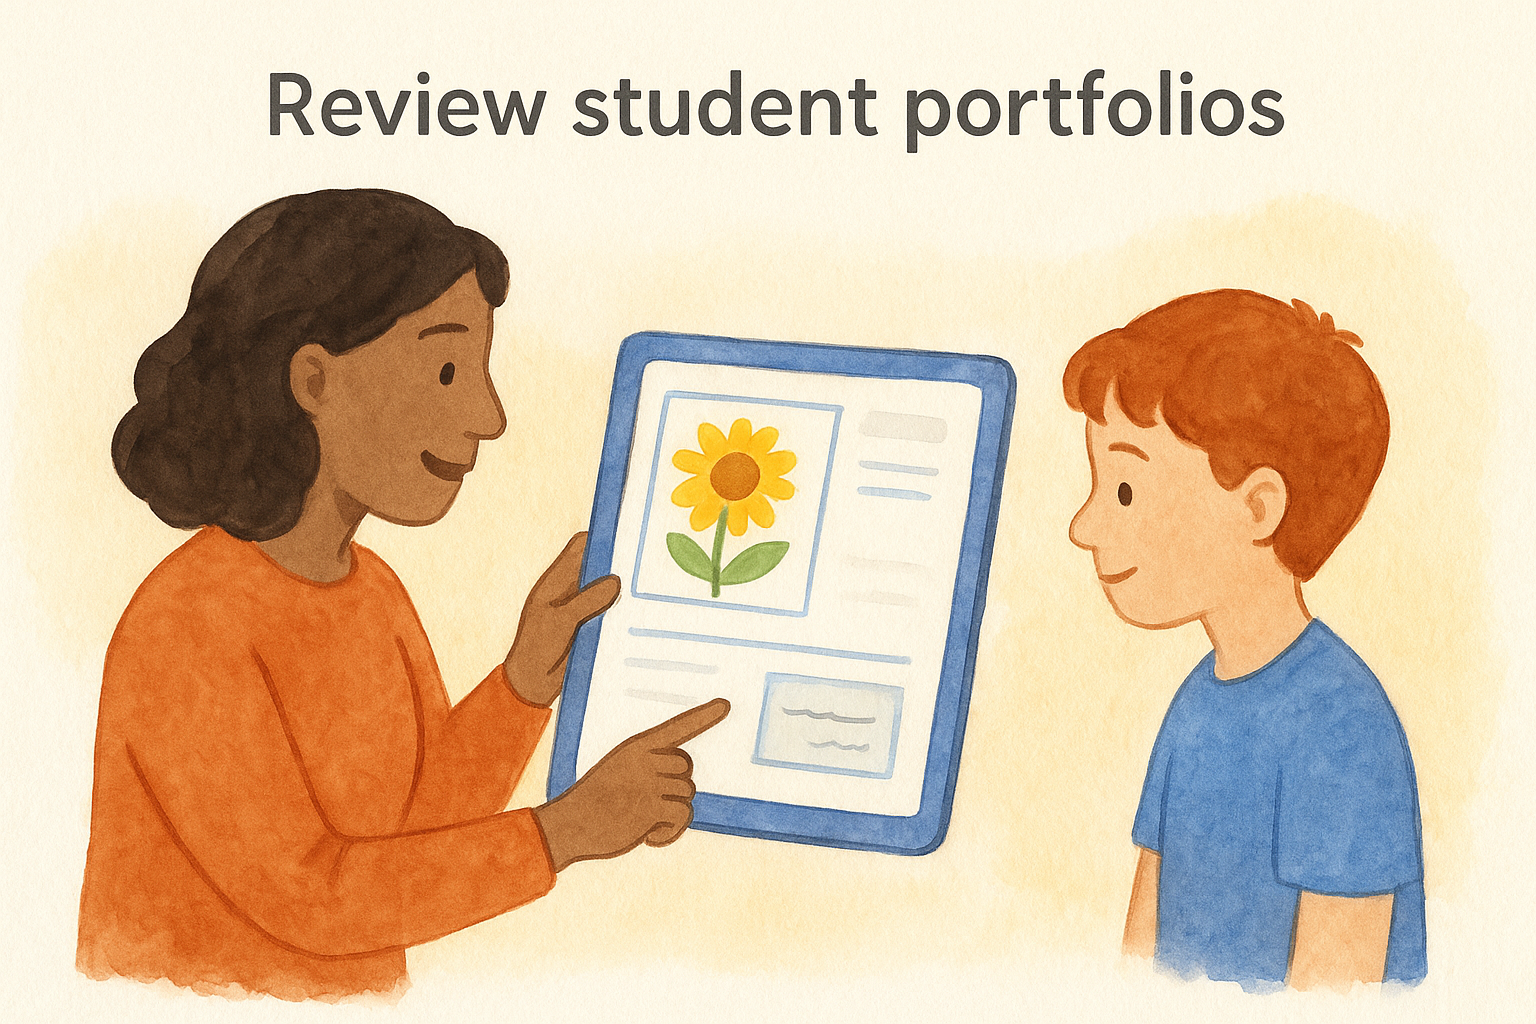
Review student portfolios
Every piece of approved work a student submits lands in their personal journal, which builds automatically into a portfolio across the school year. You can scroll through any student’s journal to see how their writing, drawing, or oral responses have changed from September to May. This makes portfolio-based conferences with families much faster because the evidence is already organized and timestamped for you.
Leave feedback students can act on
When you open a student submission, you can leave written comments, voice recordings, or emoji reactions directly on the post. Voice feedback works especially well for younger students who can hear your tone and re-listen as many times as they need. Keep feedback specific: instead of writing "good job," try "your label on the diagram is accurate, now add one more detail to the body section." That kind of targeted comment gives students a clear next step.
Approving a post and sending feedback are separate actions in Seesaw, so you can comment privately before the work appears in a student’s journal.
Track progress with Skills
Seesaw lets you attach custom skill tags to any activity or piece of feedback. You create the skill names yourself, for example "Reads with fluency" or "Supports claim with evidence," and then tag student work against those skills over time. The Skills report pulls this data into one view so you can spot which students need more support before report card season arrives.
Keep it simple
The seesaw classroom app does a lot, but you don’t need to use every feature on day one. Start with one class, get your students logged in with QR codes, and assign a single activity. Once that process feels routine, add portfolios and feedback into the mix. Build from there. Teachers who try to launch every feature in the first week usually abandon the platform by week three because the learning curve feels too steep.
Your goal is to reduce the friction between teaching and documenting student growth, and Seesaw genuinely helps with that when you give it time to become part of your routine. Small, consistent steps will get you further than a big launch that burns you out. If you want more practical tools and strategies to support your classroom, visit The Cautiously Optimistic Teacher for resources built specifically with teachers like you in mind.